
Our own Eco-home is complete!
- Sep 26, 2025
- 4 min read


3 years ago, we set out to build a sustainable home on a modest budget, tucked away on a narrow back-garden plot in Bristol.
We deliberately looked for small, awkward plots because our budget was so small. When we found the site at Belfry Alley, we treated a previous failed planning application as a helpful checklist of where a new design could improve. Using the council’s feedback as our guide — and submitting a pre-application — reduced much of the risk before we bought the land. You can read about this process here.

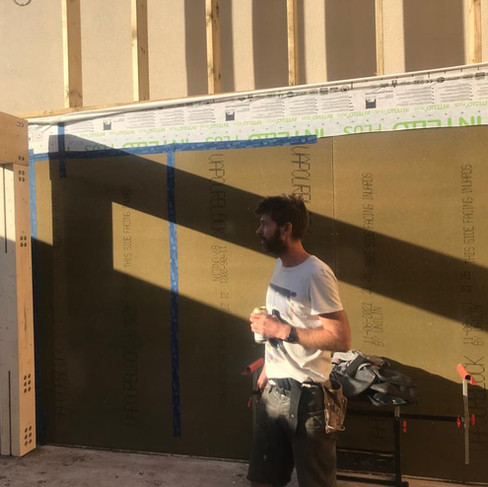
Because the plot is small and accessed only by an alley, prefabricated construction wasn’t an option. Masonry would have been suitable for many reasons but was not within my skillset, and not a sustainable choice, nor likely able to achieve the high levels of performance we wanted. So, we built a simple timber-frame structure on an insulated raft foundation, working within tight scaffolding gaps. The construction system is all breathable with natural insulation and a lime-based render. I really like this system because:
The timber is easily available and cheaper than engineered timber I-beams
The external wood fibre is brilliant acoustically as well as thermally. Applying it externally dramatically reduced thermal bridges. It also has thermal mass which helps regulate temperature swings.
The internal racking board also functions as the vapour barrier and air-tight layer; essential for projects aiming to achieve Passivhaus levels of air-tightness.
Insulating with the Warmcel blowing machine is so quick, we were done in a day.
There is no cavity, instead relying on breathable, vapour open materials. Although robust, a cavity can act as thermal bypass and needs to be drained, vented and fire protected; which can lead to some fiddley detailing. A good lime render finish is key to making this breathable system work.


Drainage proved a challenge. We couldn’t connect surface water to the public sewer, and our soakaway design was technically too close to the building. But with engineering input we managed to demonstrate that the soakaway could be located close to the house with increased stiffening to the reinforced raft slab; the well draining soil helped to allow this. You can read more about this and the construction system on a previous blog if interested.
Cost forced us to make some compromises — such as choosing affordable triple-glazed uPVC windows instead of more expensive timber/aluminium composites — but we refused to compromise on key systems like airtightness and MVHR, which we added later even though they weren’t in our original budget. Inside, we used reclaimed and repurposed materials where possible. Such as old metal gates which form the balustrades to the mezzanine office. We found a free kitchen on Facebook marketplace which, with some minor adjustments (new worktops and a few cupboard doors etc) looked great in the space and functions perfectly, and cost just £500 (plus my time).

We also found a second hand sink for the bathroom which was ideal for the concealed WC cistern arrangement we went for with the plumbing behind the tiled/clad casework.

The finished house meets the AECB CarbonLite Newbuild standard for energy efficiency. I carried out the energy calculations during the design phase and as the build progressed but am yet to submit for certification. It comes close to Passivhaus performance, with excellent airtightness (0.58CH). I discuss energy targets and other aspects of the build in a presentation I gave for the Green Register back in March 2023.
Much of the construction was done by us (me and my partner Amy), with help from friends. It was a wonderful experience and I would do it again in a heartbeat. Building the house from start to finish has certainly improved my architectural detailing knowledge.


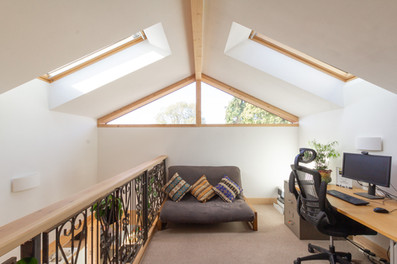


The house is incredible to live in. Very warm. Our energy bills are basically zero. The MVHR provides constant clean fresh air. We can dry our clothes inside in the winter (unbelievably quickly) with not a sign of mould....which is super handy now that we have a baby boy, Orson to clean up after!
Key Insights & Lessons
Look for difficult sites – Awkward plots can offer opportunity if you’re willing to think creatively.
Use planning history to your advantage – Past objections highlighted what to avoid and guided our design decisions.
Engage early with planners – Pre-application advice reduced risk and clarified expectations.
Face regulations proactively – With professional support, we were able to negotiate exceptions for drainage and other constraints.
Reuse creatively – Repurposed and reclaimed materials saved money and gave the house unique character.
Hands-on involvement matters – Doing much of the work ourselves gave insight into construction and helped us make better design decisions. It also mean that we were in full control and did not have to rely on others. And of course, it made the build affordable. It would have been perhaps three times more expensive if we paid a main contractor.
Patience pays off – Slowing down prevents mistakes, improves workmanship, and ensures a better long-term result.
Less is best - With a small budget, focus on quality to quantity.
Empathy - stepping into the shoes of a builder, client and architect for the project has given me invaluable empathy for all parties involved in a build. A good designer should really understand how their drawings will be interpreted and the work involved.
If you would like a more detail account of the build, you can visit The House Planning Help Podcast and an episode featuring the project.


Comments